|
...Continued from Page 8.

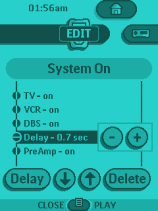
Editing a macro. |
This permits some interesting possibilities - you will technically never have to completely reprogram a macro. Want a new command added? Just add it to the end of the list and reposition. Changed to a new brand of device? Don't worry, macros reference the button, not the specific command(s) stored on them. Changing the original button also changes your macro (though deleting is permanent).
Timers - for those who take HT very seriously.
Timers are a new feature that were added to the TS-1000 about a year after its release. Since the Pronto already featured a built-in clock, whose sole purpose seemed to be to give you yet another thing to change on Daylight Savings, it was a simple matter to add a day-of-week option and thus turn this into a practical function. Timers can be used to set VCR recordings, power a system on or off, or even be used as an alarm clock. They're located under the Macro Menu, but in their own special section (adding a new group gives you the option of which type to create). Each timer button can reference a single button - either a device function or macro - under both "Start" and "Stop" screens. Since the "Start" and "Stop" functions can be completely different - even run on different days - this could effectively be thought of as a two timers on one button.
The Pronto permits you to set the exact day and time of day to run the timer. Want something to run on Monday, Thursday and Friday? No problem. Another button, "Weekly", means the timer will continue to run after the first week. Otherwise, each configured day will be unselected after the timer has run, making it a one-shot event. Timers don't need to be "activated" on the remote to run. As long as there is enough information, the timer is alive and will operate when configured. When the timer runs, a little alarm clock icon appears at the top of the screen.
Advanced device programming.
Have you ever come across this problem: your television and receiver inputs don't match up. Someone else who is slightly less adept at technical things, turns on the system and immediately complains that the picture and sound don't match up. Well, if your devices support the appropriate codes, the Pronto can be programmed to avoid this sticky situation altogether. Using what are known as "discrete code" - codes that perform a single function, such as "Power On" or "VCR 2", the Pronto can automatically select the correct inputs each time a device is selected or the power turned on. Although many devices simply don't support this kind of functionality, others do and may even come with the appropriate commands on their original remotes - the TSU2000 may even include such codes in the preprogrammed database. In those cases, you should be able to create a fully automated system without using the computer; otherwise you may have to check for codes online to download or find other workarounds.

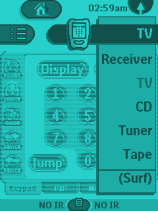
Notice the "NO IR" labels at the bottom. |
To add a single learned command to the device's "action" list, enter "Learn" mode, open up the device menu, then while holding the left or right hard button, select the device. The Pronto will enter "Learn" mode and assign that signal to the device. If you'd like to go beyond that, an undocumented feature will allow an entire macro to be attached to the device. Instead of just holding one of the lower hard buttons when you select a device, hold the [Backlight] button and a bottom hard button. You'll automatically switch over to the Macro side of the remote, but with the macro name reflecting the device name. From here you can navigate the remote as normal, entering whatever commands you like. During normal operation, if you don't want the assigned macro or signal to transmit, holding down the [Left] or [Right] hard button (which read "NO IR") while selecting it from the "Device Menu" will suppress any commands. Note that there is no way to duplicate that feature from the "Home Menu".
| 
